I decided to make a few photos and experiment with making some wallpapers out of them. Unfortunately the weather and the fact that it's winter with little snow offered me little options of what to make photos of, even macro.
These photos are higher resolution than 1920x1080 but don't expect them to be crystal smooth: my camera shows a lot of noise in low-light conditions( it was cloudy, and macro photos require quite a lot of light). For comparison, I'm uploading the original photos too.
Sunday, December 25, 2011
A couple of more-than-FullHD wallpapers
Tags:
close-up,
fullhd,
hd,
macro,
photography,
photos,
wallpapers
Friday, December 9, 2011
Thursday, December 8, 2011
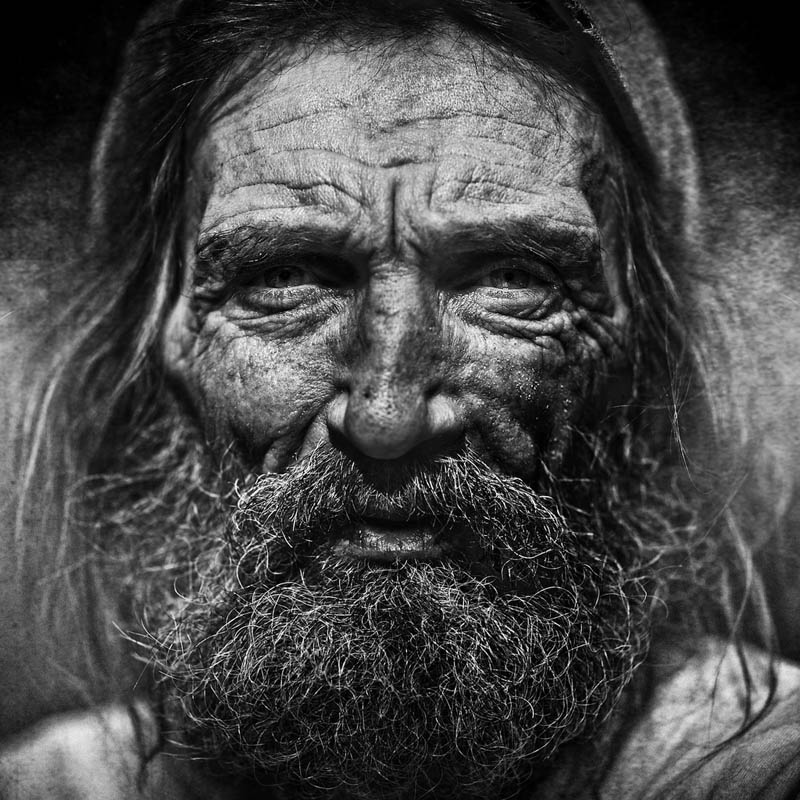
A collection of stunning Black&White portraits
These are the portraits of homeless people. I think the photos are very impressive.
Tags:
artistic,
black and white,
bw,
close-up,
photography,
portrait
Wednesday, November 23, 2011
A few more virtual photos
After I gave it a try, I found it's actually an entertaining activity and I discovered that taking these screenshots in Garry's Mod which I like to call them "photos" can help me plan a photo shooting in real life. Instead of figuring out how to make some photos on the spot, I can first experiment in the warmth of my home and then head out for a shoot.
Anyway, these are a few more photos I made in Garry's Mod, exploiting it's screenshot feature and simple DoF:
Too bad 'macro-photography' doesn't show anything new in a game :). I'd need a very high-poly prop for that.
The screenshots were taken on a favorite map of mine, gm_valley.
Anyway, these are a few more photos I made in Garry's Mod, exploiting it's screenshot feature and simple DoF:
Too bad 'macro-photography' doesn't show anything new in a game :). I'd need a very high-poly prop for that.
The screenshots were taken on a favorite map of mine, gm_valley.
Tags:
depth of field,
dof,
experiment,
gaming,
photos,
virtual
Sunday, November 20, 2011
Virtual photography?
Since I couldn't find anything interesting to photograph in the past couple of days( well I did take some photos of a small block of ice! :) ), an idea popped in my head. I remembered that in Garry's Mod ( a Half-Life 2 modification), I can arrange things as I do in the real world and I also benefit from a few post processing tools such as a simple Depth of Field simulator. And I also have a very versatile focal range camera that could make real world photographers envy.
So I assumed the role of Gordon Freeman and went with Alyx on a short photo shooting session. We found a cool cave in gm_skylife and took photos:
I would have tried to make different expressions on Alyx's face, but unfortunately the face poser seems to be broken and if I modify the intensity just a bit the face starts looking weird.
So I assumed the role of Gordon Freeman and went with Alyx on a short photo shooting session. We found a cool cave in gm_skylife and took photos:
I would have tried to make different expressions on Alyx's face, but unfortunately the face poser seems to be broken and if I modify the intensity just a bit the face starts looking weird.
Tags:
gaming,
inspiration,
photography,
photos,
portrait,
virtual
Wednesday, November 2, 2011
Unbelievable photographing technology
A new fantastic piece of technology appeared, that is available for buying. It's a tiny box that does not resemble at all with what the industry has familiarized us. This tiny thing is called "Lytro" and it's actually a camera that takes pictures in a special way...
It's probably so tiny because it doesn't need all the optical equipment a traditional camera has. It doesn't feature focusing. How surprising! You actually get to take the photo and focus after that! That's what's unbelievable. It works because the camera doesn't record only the light hitting its lenses, it records the entire lightfield in the front of it.
You can read more about the science of this technology here.
The price is not so tiny by comparison, but it's acceptable, since it's such a unique method of capturing memories that can literally come alive when you play with the focus later. There are 2 models, with different colors. The first one can take up to 350 pictures(8 Gb) and costs 399$. The second has a 16gb storage capacity and can take up to 750 photos, costing 499$.
There's a gallery of photos that have adjustable focus. It's really fun and exciting to examine photos this way!
It's probably so tiny because it doesn't need all the optical equipment a traditional camera has. It doesn't feature focusing. How surprising! You actually get to take the photo and focus after that! That's what's unbelievable. It works because the camera doesn't record only the light hitting its lenses, it records the entire lightfield in the front of it.
You can read more about the science of this technology here.
The price is not so tiny by comparison, but it's acceptable, since it's such a unique method of capturing memories that can literally come alive when you play with the focus later. There are 2 models, with different colors. The first one can take up to 350 pictures(8 Gb) and costs 399$. The second has a 16gb storage capacity and can take up to 750 photos, costing 499$.
There's a gallery of photos that have adjustable focus. It's really fun and exciting to examine photos this way!
Tags:
cameras,
photography,
technology
Sunday, October 30, 2011
Sunday, August 14, 2011
Cross Processing in GIMP
A quick tutorial showing how to achieve cross processing with GIMP
This effect can be used to gracefully increase the contrast of a photograph, giving the shades a blue tone and making the bright parts yellowish. Let's start!
Here's a description of the effect on Wikipedia:
"Cross processing (sometimes abbreviated to Xpro) is the procedure of deliberately processing photographic film in a chemical solution intended for a different type of film. The effect was discovered independently by many different photographers often by mistake in the days of C-22 and E-4. The process is seen most often in fashion advertising and band photography, and in more recent years has become associated with the Lo-fi photography movement"
First of all, load your image in GIMP. I used a photo downloaded from http://www.sxc.hu, a free stock-images site. Credit goes to "aljabak" for the image.
Now go to Colors>Curves, and switch to the red channel. Make an adjustment curve like in the image( basically an 'S' curve with the top-most point moved a bit to the left.
Switch to the blue channel and make an adjustment curve like in the image( this will make the shadows look blueish).
If the image requires it, you can increase the contrast, but only by a little, else it will look to harsh.
Now add a new layer and fill it with a pleasant yellow(not too bright, but not too dark either). I used R255 G204 B0.Switch the mode to overlay and reduce the opacity to somewhere in between 10% and 20%. I used 15%
The final image looks like this:
And here's 2 more examples:
I hope you enjoyed this quick tutorial! Have fun!
Subscribe to:
Posts (Atom)